Showing posts with label tips and tricks. Show all posts

7.07.2013

Italy Trip: Food in Rome

Food is extremely important... especially in Italy! In Rome, I didn't necessarily learn as much about food history as I did in the Tuscan region, but as our first stop in Italy, Errol and I learned a lot of the "traditions" and restaurant etiquette. 

COLAZIONE:
I rarely ever eat breakfast... I prefer to sleep right up until I have just enough time to change and run to the bus for class. But when you're trying to have enough energy for the physical and mental toll that Rome takes out of you, carbo-loading is a must. And eventually, it became part of my stomach's food clock that has even rolled over to now! 

Of the three places we stayed in Rome (and in the other cities - more on those separately), the breakfast was the same: cappuccino, bread, pastries (filled with cream, nutella, etc.), and various spreads. Another benefit of breakfast was that it was always included in our hostel/B&B, so we saved Euros that way. 


PRANZO:
We always wanted to have light but filling (is that possible?) meals for lunch so we didn't get food coma. That usually meant pizza! Pizza in Italy is quite a delicacy, and made me forget the greasy dough I used to get from Little Caesar's for $5 for a quick college dinner. We had lots of different types of pizza, but all menus had generally the same kinds:

  • Margherita - tomato + mozarella
  • Napoli - 4 to 5 anchovies spread across the pizza; only need a little bit for the full effect! 
  • Prosciutto - self-explanatory; delicious, melt-in-your-mouth slices 
  • BIG TIP: "Pepperoni" in America is "salame piccante" in Italy, and is much better! 

My absolute favorite pizza was in Dar Poeta in Trastevere, a quaint area in southeast Rome. This pizza had the perfect combination of tart and savory, and I couldn't get enough of it:

buffalo mozzarella with artichokes topped with parmigiano reggiano

Just as a heads up, restaurants try to maximize tables in a small area, so every place has an outside area. We almost always chose to sit outside! Just keep a look out for the scooters and Smart cars that try to squeeze through; they get pretty close!


ANTIPASTI:
Probably one of the more expensive places we ate was at Enoteca Cavour 313, recommended by our Rick Steves guidebook. These pictures are what we had for dinner one night, but count as appetizers in my book. We got to have some delicious cheeses, and a first - beef carpaccio! As you can see it's raw beef sliced extremely thinly, topped with olive oil, red onion, capers, and a couple of anchovies. Surprisingly it was almost too salty for me (those who know me know that's a rarity!), but I still really liked it.


PRIMI e SECONDI PIATTI:
Another restaurant we went to was our first full meal with multiple courses, and we learned a lot.
  1. Water is never free in a restaurant. You order one water for 2 people, and they bring out a 500 mL bottle that you ration on your own (generally 2-3 Euros a bottle!).
  2. Sitting costs money. There's lots of standing eating, or getting food to-go and eating at a square. In fact, when I think back I think only tourists eat at restaurants because true Italians think a cover charge is ridiculous (which it is). It will cost 2-3 Euros per person tacked onto the bill. 
  3. BIG TIP: If there's a cover charge, DON'T TIP. Really, don't. 
  4. There's a charge for bread, and you get it no matter what. Most Italian restaurants in America give you bread with olive oil and herbs, or garlic breadsticks. In Italy, you get bread with olive oil and vinegar (balsamic or white wine). And that's normally 2-3 Euros. 
With that, you already have added at least 6 Euros to your bill before you've even had your meal. Crazy, right? As we progressed through the trip, we ate at restaurants less often simply due to all of the extra hidden costs. 

That being said, the food at this restaurant (whose name escapes me) was delicious! Top left is buffalo mozzarella (absolute fave), bottom left was spaghetti carbonara (on my food bucket list), and bottom right was Errol's veal. 


If you are sick of pasta - which you are bound to be no matter how much you love it - there are kebab places all over the place! Super cheap, super delicious, they're essentially the gyros you know of, but in wraps. Once we discovered these, we ate at one every couple of days. I wish we had more places like this to replace McDonald's! 


DOLCI:
Last but not least was the sweets! In Rome, I didn't have very much dessert. However, we did have plenty of gelato at any time of day! There are little window shops everywhere, where you can order your cone or cup and be on your merry way. There are tons of flavors, and some are quite interesting... but Errol's favorite was mango! Here he is holding one of the dozens of mango in a  "cono piccolo".


The only other dessert we had in a restaurant in Rome was the nutella calzone... I think you can guess if I liked it or not.


Another dessert on my food bucket list was panna cotta, a creamy dessert that is a mix between pudding and jello and is delicious! I grabbed one of these in a window shop for a couple of Euros.


Overall, the first city in Italy gave us a great introduction to food, and the best was yet to come! If you ever go to Italy, I hope you learn from our restaurant mistakes and try a lot of the things we did.

6.23.2013

Italy Trip: Galleria Borghese Art Lesson

I may be forever biased because this was my first course in any art piece, but this was definitely my favorite art museum of Roma. Because of the required reservations, there are only about 350 people in the building at once. This allows you to enjoy pieces without being herded and shoved around (as I experienced in the Vatican Museums... More on that later).
Beautiful facade; it looks smaller than it is in person! 
Getting there was an adventure on its own. 

TIP #1: It is required to make reservation to this place at least days in advance.Have the place you're staying book the reservation for you (saves the international calling fee). They'll provide you with a booking number that you give at the Galleria to confirm.

We got off the Metro in a place that didn't at all look like the entrance to a museum. 


TIP #2: The VILLA Borghese is the name of the entire grounds (which includes horseback riding, a zoo, numerous museums, and an expanse of green grass for picnicking). Keep this in mind and leave AT LEAST 45 minutes to find the place.

Errol and I got horribly lost because we exited the metro at the galoppatoio (Italian for "gallup"). It took us asking 4 different people in the rain, "Dov'e' la Galleria Borghese?".

TIP #3: Italians don't give good directions.

TIP #4: Don't ask a question in Italian if you can't understand the answer in Italian.


Unfortunately I couldn't tell you how to properly get there without walking through horse sh*t, but here's a map! 

I'm pointing to where we got off with the dotted line the roundabout path we took. And circled for you where you should ACTUALLY get off.
We finally arrived around 8:50 for our 9am reservation and there was still a line despite our Roma Pass. We were  all there for the same time slot, just waiting to get our tickets. It wasn't until about 9:10 that we finally got in.

TIP #5: They make you check your bag because there's no picture-taking allowed.


We were in the first marvelous Room of Emperors before we realized we had no idea what we were looking at. It was then we decided to use an audio guide that we saw many people using.

TIP #6: If you're with someone else, bring your own pair of headphones and share a guide to split the cost! It takes coordination, but definitely works.

I have to say the audio guide was essential to enjoying the Galleria. As much as I would like to be, I'm not an artwork connoisseur. The audio guide gives you an overview of a room, then you walk around and can listen to other specific works.


Here are some of my favorite ones (found these images from the internet). The information is what I can remember from the audio guide. I do not claim to be any sort of art expert, so if I'm wrong please feel free to correct:
Caravaggio's La Madonna dei Palafrenieri: Our first exposure to the painter , who we saw a lot more of in the Vatican Museums and in Florence. It demonstrates the his typical dark background with unseen light source. Virgin, with the help of her son, tramples on a serpent (emblem of evil). 
Titian's Sacred and Profane Love: "Sacred" as fully dressed and "profane" as nude.  In the center, is Cupid mixing the waters within the well/sarcophagus the ladies are sitting on, suggesting that the ideal love is a mix of these two kinds.
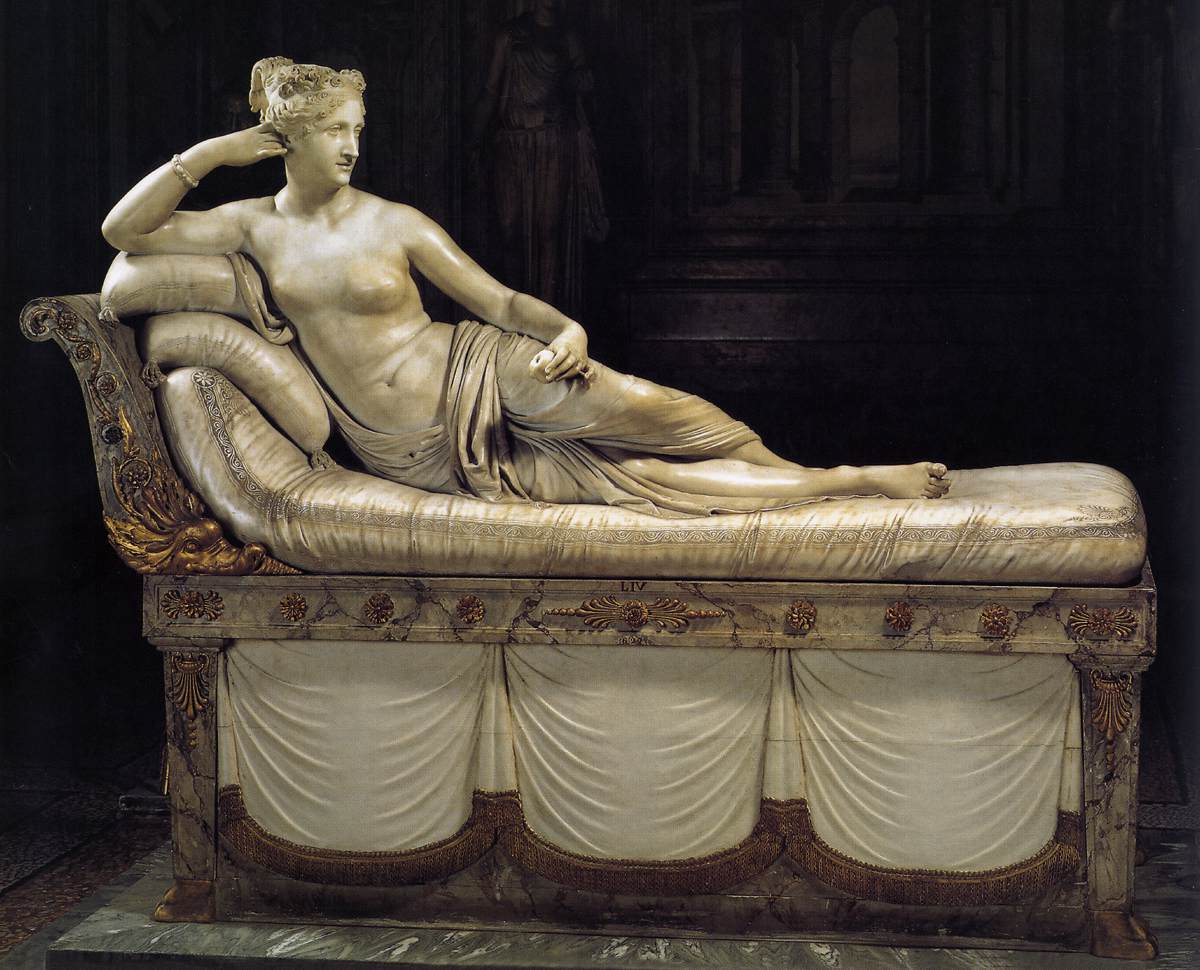
Canova's Paolina Borghese: I really loved this one just because of how real the sculpture looked. Not just because of her body, but the cushions she lays on. They look so comfortable!  
Bernini's Ratto di Proserpina: Depiction of the abduction of Proserpina to the underworld (represented by the three-headed dog behind the two figures, you can't see from here) by the god Pluto. On the left, you can see how soft the marble flesh looks in Pluto's arms. Tons of action and detail in this sculpture.

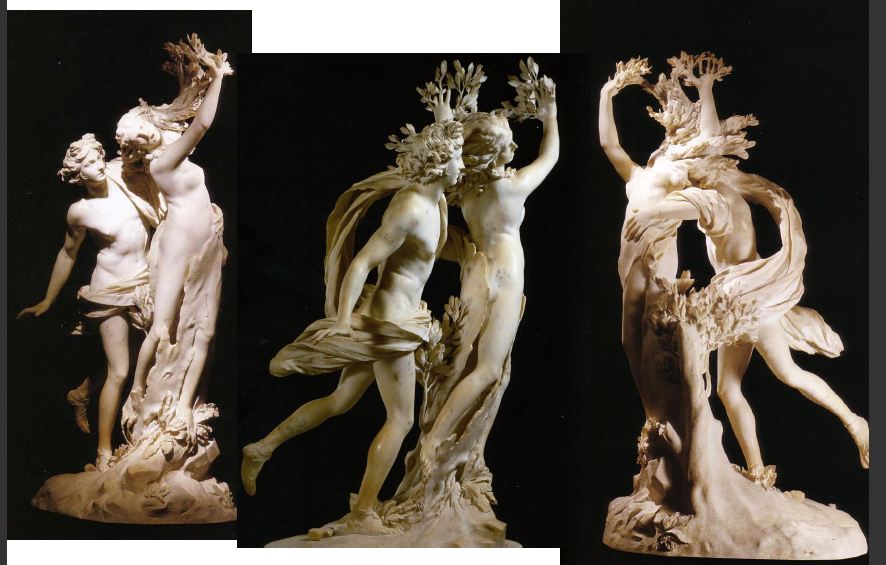
Bernini's Apollo and Daphne: This is the final room of the Gallery, and for good reason (this is a compilation of it at multiple angles). It depicts the climax of the story of Daphne in Metamorphosis. Apollo is hit by Cupid's arrow and sees Daphne, daughter of Peneus the river god. But Daphne has been struck by Cupid's love-repelling arrow and denies love of men. As Apollo catches up to her, she prays to her father to destroy her beauty, and she becomes a tree. The sculpture depicts her as the bark begins to engulf her body and her hair turns into leaves and branches. My favorite piece! 
After the Galleria, you can spend the entire day in Borghese Gardens. 


It's compared to NYC's Central Park, and if it hadn't been raining (as it did every day we were in Rome), we would have done so. The original plan was to have a picnic there, but we couldn't find a nearby market so we walked off site to a restaurant and came back to walk around. 

This was a lovely day; I highly recommend going to this place! 

8.15.2012

How-To: Make a Towel Bunny

If you've ever been on a cruise (and even if you haven't, now you know), each time you enter your room, you will find a towel animal hanging out on your bed. This summer, one of the classes on the ship was how to make some! So I thought I would share with you all how to make one! I'm not as good as the staff on board, but I tried my best. It's hard to explain in words how to make these, but hopefully the pictures help. Please leave a comment if you have any questions! 

Things you'll need:
1 large towel
1 medium-sized towel


Step 1: Place your large towel in a landscape position and roll the left and right ends to the center.

Step 2: Fold towel in half so that the crease is on the outside

Step 3: Twist the ends out a little bit (this will be the feet of your bunny). 

Step 4: Take 2 legs into each hand and pull outward (this part is hard to explain, try to follow the picture!).

Step 5: Put large towel aside. Now take your medium-sized towel and fold in half, landscape-wise, and have the folded side facing away from you. 

Step 6: Put your finger in the center of the top of your towel, take the bottom right corner of the towel, and pull straight down. Do not fold, just pull. 

Step 7: Repeat on the right side, and you will have something that looks like a bat. 

Step 8: Fold the top corner underneath, a couple of inches. 

Step 9: Fold the sides of the "bat" towards the center, like you did with the large towel. 

Step 10: Flip over the towel, and it will look like this! 

Step 11: Pull the ears down a little bit, and you have your bunny head! Place it on top of the large towel. 

Step 12: Accessorize! 

The class was provided as part of a campaign to sell their how-to book, Towel Creations. The campaign is part of a larger effort for Carnival Cruiselines to raise $1,000,000 for St. Jude Children's Research Hospital! I ended up buying it on the ship for $14.95, and 100% of the proceeds were donated.


8.12.2012

Summer Travels: The Final Vacation - Wizarding World of Harry Potter (tips and pics)


As previously mentioned, I have been to Harry Potter World 3 times now. Each time, I have learned something new about taking advantage of all your time there. 

Tip #1: Get to the park right when it opens. It officially opens at 8AM, but you can park starting at 7:30AM. That way you can be some of the first to go to Harry Potter World. It's all the way at the back of the park, so it's quite a walk, but it's best to go from the back to the front of any park. Errol and I arrived at 8AM, not knowing about the 7:30AM trick yet. We went straight to the Hogwarts ride, and there was already a 30 minute line at 8:10AM! 

Tip #2: Enter Hogwarts line through the store connected to it. The real line begins outside of the ride, and it is a line to get to the locker rooms to temporarily store your bags before getting into the line for the ride. You can enter the locker room through the store, and it is so crowded no one would ever know that you came in that way. Bypassing the first part, you have now skipped half of the line! 

Tip #3: Take a separate tour of Hogwarts castle. There is a lot to see inside Hogwarts, but you may not be able to truly absorb it all while in line. You can walk through a separate aisle through the castle, with your bags (and thus, your camera), and at your own pace. 

Tip #4: Have an early lunch at Three Broomsticks. If you've followed Tip #1, you probably get hungry earlier too. Having lunch early, around 11AM, you will miss the long lunch line! 

Tip #5: Buy a Butterbeer with souvenir cup early. Turns out that if you buy a souvenir cup, you get discounts on Butterbeer refills and soda for the entire day. 

If you are an HP fan, you will love HP World. You enter the park, and you're in Hogsmeade. To your right, you'll see the Hogwarts Express. Every 30 minutes, there's a performance (Hogwarts choir, Beauxbatons danceres, Durmstrang dancers). You can have lunch at the Three Broomsticks, and Hogshead is also attached where you can get a pint. You can buy Every Flavour Beans at Honeydukes. And so much more! 


For anyone curious, Butterbeer tastes exactly how you might imagine. But no, it's not alcoholic. You can buy frozen or soda-style, and it is delicious. The best way to describe it is a butterscotch cream soda. The foam on top is the best part, and is actually added separately. 


If you're a Rockefeller, you can afford to buy all of the merchandise. But if you're a poor student, the next best thing is to take pictures with the clothing as if you did buy it all :)


Any of you who are planning to take a trip to Islands of Adventure, please let me know if you need any more tips! It's definitely worth the long lines. Next trip will hopefully be to England to see the actual sets!