Showing posts with label baking. Show all posts

1.23.2014

Bake-venture: Chocolate and Caramel Biscotti

I had the random inspiration to make biscotti this weekend. Baking is something that is unfamiliar to me - honestly sticking something in the oven and hoping it comes out right makes me nervous. At least on the stove, you can tend to it and give it attention and adjust as needed. I think the only way to get over this is to bake some things successfully.  I think I'm on my way! 

I used this recipe for my biscotti: http://jellytoastblog.com/2013/02/salted-caramel-chocolate-biscotti.html/

Ingredients: 
3/4 cup sugar
1 1/2 tsp vanilla extract
2 large eggs
2 & 3/4 cups all purpose flour
1/2 teaspoon baking soda
1/4 teaspoon salt
15 caramel candies, unwrapped and chopped small

Directions:

Preheat oven to 300. Line a baking sheet with parchment paper and set aside (I used my Silpat!)

In the bowl of a stand mixer, beat together sugar, vanilla and eggs until white and creamy. 

In a separate bowl whisk together flours, baking soda and salt.
With the mixer on low, slowing add dry ingredients to the wet ingredients. Mix until just incorporated.
Fold in caramels and 1/3 cup of chocolate chips. 

Divide dough in half and form into two 12 inch logs on prepared baking sheet. Flatten slightly so logs are about 3/4 inch high. 


Bake for 35 minutes, and take a peak because you've never see biscotti pre-sliced before!


Remove and allow to cool for 10 min. I picked off the caramel leakage on the sides and ate them. No shame in that.


With a sharp knife, slice each log. I used a serrated bread knife, just be careful not to damage the loaf too much. 


Lay biscotti down on the cut sides. 
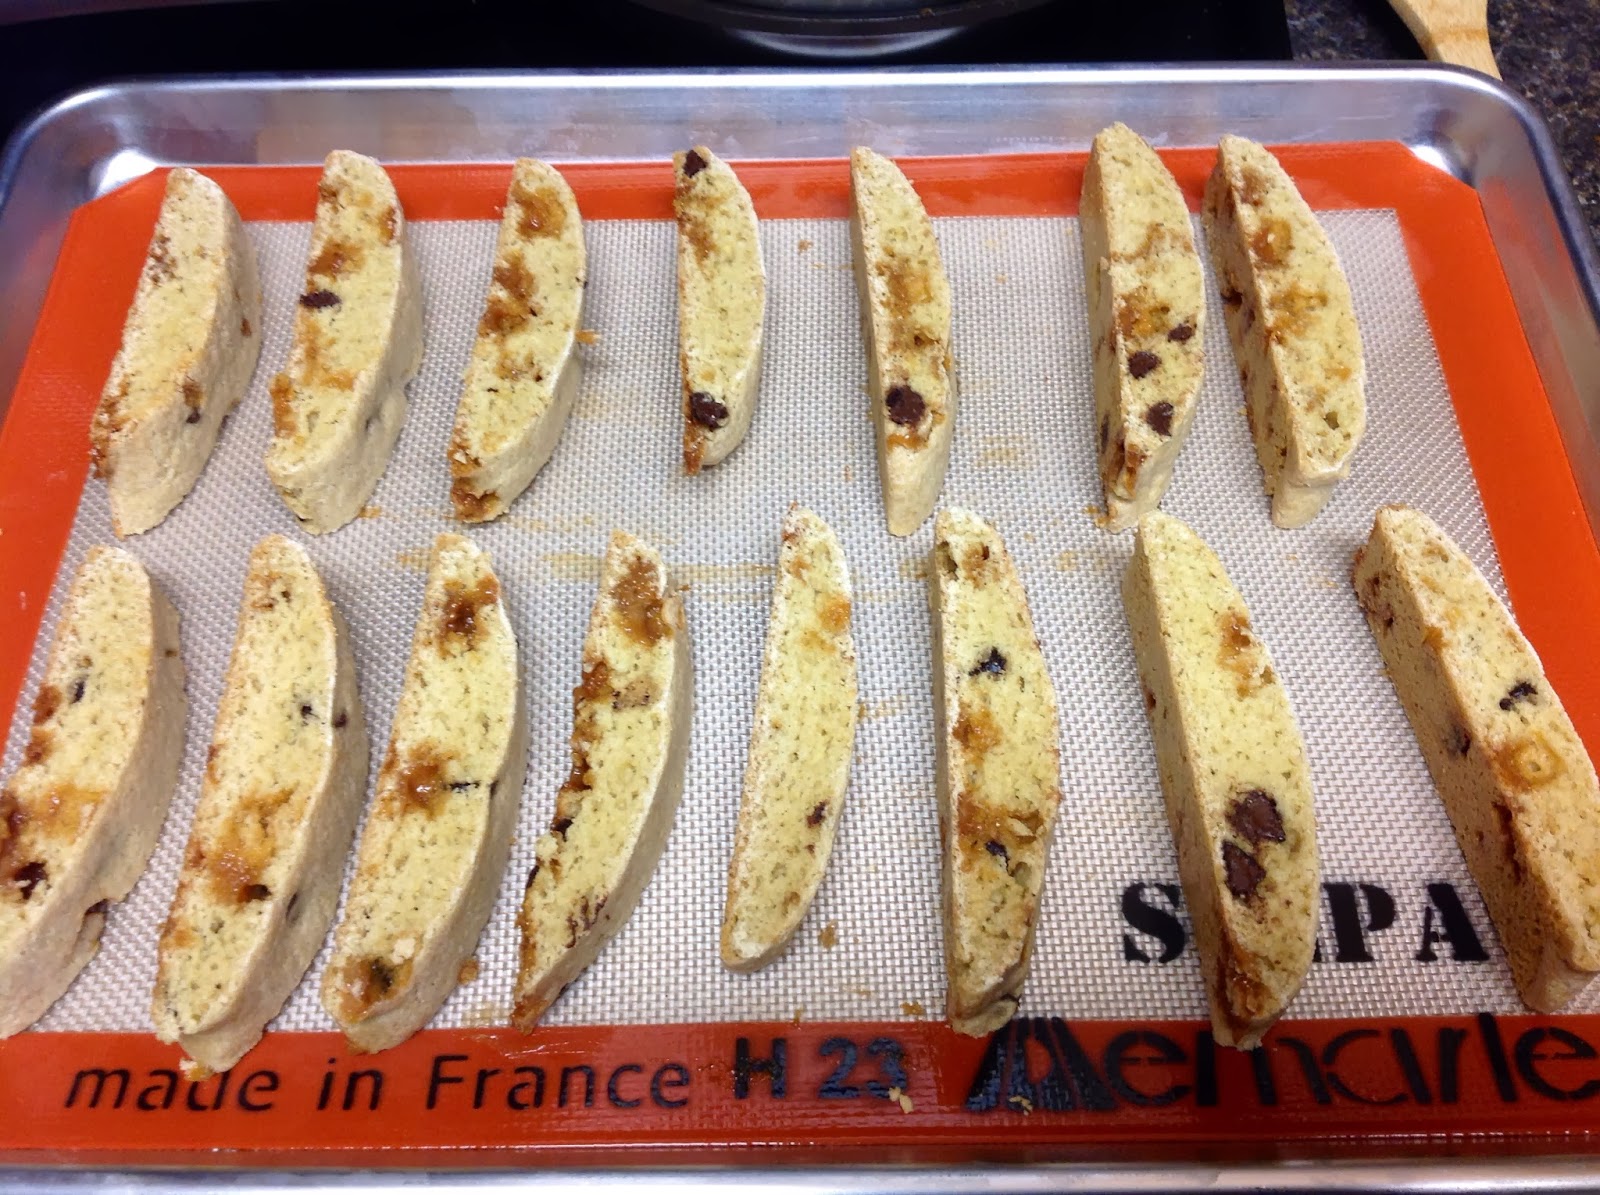

Bake again for 10 minutes. Flip the biscotti over and bake for an additional 10 minutes or until biscotti are nicely dried. 

Voila! I believe they turned out really well. Ideally I would have melted chocolate, drizzled it over the biscotti, and sprinkled with sea salt to make them salted caramel biscotti. I tried twice to melt semisweet chocolate chips and both batches seized up, so I gave up. Another adventure for another time. I don't have much of sweet tooth, and these are not too sweet (but still sweet enough for everyone!). 


As a side note, I'm in love with my Silpat! Nothing stuck to it - even the caramel that seeped out of the biscotti loaves. 

Bakeventure a success! It lifted my confidence a bit, until next time...

1.14.2014

Cook-venture: Strawberry Gooey Butter Cookies

I've had a lot of foodventures lately, and I think that's because I'm determined to be happy and enjoy my final semester in Chapel Hill. I'll only be moving to Durham next year (~20 minutes away), but it won't be the same. My friends will be all across North Carolina. What better way to bring people together than with food?

Anyways, I first had these cookies when a friend made them and they are my first "via Pinterest" creation - and it's SO EASY!

Preheat the oven to 350 F. All you need is this box of cake mix (I believe any cake mix will do... but they they wouldn't be strawberry cookies):


1/2 cup of butter (2 sticks), 1 block of cream cheese (I used Neufchâtel), and an egg - all room temperature so they mix together easier. 


Go ahead and spend a few hundred bucks on a standmixer just for this recipe. Beat together the butter and cream cheese. Once that's done, add the egg.


Slowly add in the cake mix as the beater is on low. This dough is VERY sticky. Stick it in the fridge for ~30 minutes to help. 


Now I get to feature my new toy - my Silpat! It's a lovely nonstick silicone mat. And it's made in France. 

Scoop out the dough, using about half the size of the clumps I've made (my cookies were way too big!). Put in the oven until the dough has set (don't want it to be overbaked). I would say about 10-15 minutes, but it may be different with smaller cookies.


I don't have a final picture, but just imagine they looked like this: 


This picture is also from the website I got the recipe from: http://cookiesandcups.com/strawberry-gooey-butter-cookies/

1.10.2014

Foodventure: Buttermilk Biscuits

For the last Sunday morning before school started, I thought I'd make a nice breakfast - especially since Errol was in town too. So decided to try out the new biscuit cutter that my mom gave me for Christmas and make my first biscuits from scratch. 

I used the recipe from The New Best Recipe Cookbook that Errol got me a few years ago. 

First you blend together the dry ingredients:


A whole stick of COLD butter, cut into cubes. I even put it in the freezer for a few minutes after I cut it, just to make sure. You want the butter to be cold because when it bakes, those pieces of butter will melt and make yummy air pockets and flakiness.


Add in the buttermilk (I've read you can make your own if you don't have any on hand). 


Now process it until just combined, about 8 pulses. 


Pour it out onto a floured surface and bring it together into a ball. Do it without working the dough very much at all, just push it together. 


Roll it out to the desired thickness. Mine was definitely too thin as you can see; I thought they would rise a bit more, but it could also be because my baking soda is about a year old. 


Put it on a baking pan. You can see on the bottom right corner that that's what I made with the final scraps. No wasting here! Although next time I'll probably work the cracks out, since it came apart once baked. 


And that's all she wrote! We put a variety of things onto the biscuits, including:

  • More butter 
  • Honey 
  • Strawberry preserves
  • Apricot preserves 

7.02.2013

Bake-venture: Peanut butter-banana bread with chocolate chips

During the school year, it was difficult to find time or energy to make anything from scratch. One miraculous weekend, I did! And every time I do, I think "That didn't take long, I could do this regularly"... then the laziness kicks in. 

As I said in my first banana bread post, this is always a great way to use your bananas that seem inedible and engulfed in blackness. 

Perusing online, I found this delicious variation from Brown Eyed Baker! 

Be warned: this is only for those who love chocolate chips. 

All of the wet ingredients in a bowl. Looks... appealing. 

Chocolate chips folded in last! Ready for the oven! 

And in all of it's fresh-baked glory...
Like I said, this is definitely for chocolate-lovers. I think I would try without next time since it surpassed my [very low] sweetness threshold, but any normal person with a sweet tooth would love it!

7.09.2012

Cook-venture: Banana Bread

Today, one of my roommates came with her dad to bring a carload. She brought some rugs and a TV stand, and the place looks so much homey now! I can't wait for it to be a full house.

For their visit, I made some banana bread!

The ingredients:
Dry: 1 cups all-purpose flour, 1 1/4 cups walnuts (I used chopped almonds instead), 3/4 cup sugar, 3/4 teaspoon baking soda, 1/2 teaspoon salt

Wet: 3 very ripe bananas, 1/4 cup plain yogurt (I didn't have this on hand), 2 large eggs, 6 tablespoons butter - melted and cooled, 1 teaspoon vanilla extract

The ingredients
Looks like baby food...
Used Pampered Chef Food Chopper and 1-cup prep bowl. Also pictured, the Pampered Chef Cutting Board 
Chops things in seconds! Last time I used a knife, and it was hard to keep the almonds from flying around the cutting board. 
Whisk together the dry ingredients, fold in the wet ingredients, and voila! The batter will be very thick and lumpy, but that's how it should be! Bake for 55 minutes at 350 degrees, or until a toothpick comes out clean from the center of the loaf. 
The loaf was immediately cut and eaten. Managed to snag a [very fuzzy, sorry] picture before it was completely gone!

This recipe is extremely easy, and very delicious! I recommend to anyone trying to use up those old bananas before the fruit flies start growing from it. Leave a comment if you try it out; let me know how it went! 

1.05.2012

Blondies

Worked today from 8am-2pm so I got out at a really good time with my day very free!

So what did I do?

Well, for one thing, I passed out for 2 hours.

Then I looked through my cookbooks, because it makes me happy.

I decided on blonde brownies, but didn't want to make too much so I halved the recipe. The pans I had were too big for my small amount of batter, that resulted, so I put them in my mini cupcake pan. Then I topped them with almonds, which I found to be a yummy touch.

The difference between blonde and chocolate brownies is that instead of chocolate, blonde ones use brown sugar.

Simple ingredients 

mmm buttah (and sugah)

Final Product! 

And while you may be thinking: Erin, what about your pledge to eat healthy? 

Well, that's why they're mini... portion control :) 

1.02.2012

Bake-ventures

Very glad that I didn't get to work today! Spent the day at a friend's apartment where I brought my stand mixer and she introduced me to baking from scratch. While baking, we enjoyed a nice Gator Bowl game. She went to Michigan and therefore HATES Ohio State, and I'm a Gator so... duh.

We made baby lava cakes; it was really easy!
This was my first time using the stand mixer! Very entertaining to watch :) 
Plopped the "lava" into the chocolate batter. 

After 13 minutes, voila! Just plop onto a saucer and top with vanilla ice cream 

Since the oven was on anyway, we made these: 

Place Hershey's Kisses onto a pretzel and heat at 350 degrees for 2 minutes. 
After 2 minutes, place an M&M on top and push the Kiss down flat. 


And now... off to the gym. 

GO GATORS!